
Screen printing is a popular printing technique that is used for printing on a variety of surfaces, such as t-shirts, posters, and banners. It is a great way to create custom designs for personal or commercial use. However, if you are new to screen printing, the process can seem daunting. In this article, we will walk you through the steps you need to take to start screen printing.
1. Understanding the Basics How to Start Screen Printing
What is Screen Printing?
Screen printing is a printing technique that involves transferring ink onto a substrate for example clothing, paper, signs or banners through a mesh screen. On the screen you will apply a stencil, which is used to block the image areas. When you apply ink to the screen with a squeegee over the stencil, it will be transferred onto the substrate in the desired pattern.
How Does Screen Printing Work?
The process of screen printing involves several steps, including coating the screen with emulsion, exposing the screen to a light source, preparing the ink, and printing the design onto the substrate. The ink is then cured with a heat source to make it permanent.
Advantages of Screen Printing
Screen printing has several advantages, including the ability to print on a variety of surfaces, the ability to produce vibrant colors, and the ability to produce high-quality, long-lasting prints. It is also a cost-effective way to produce large quantities of prints.
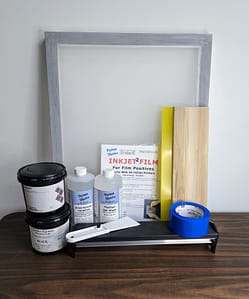
2. Equipment Needed for Screen Printing
To start screen printing, you will need the following equipment:
Screens
To start screen printing you will need, and you might already guess it, screens. Screens are the most important part of the screen printing process. They are usually made from aluminum or wood and a mesh material that allows the ink to pass through onto the substrate. The screens come in variety of sizes. Most common are 20″x24″, 23″x31″ and 25″x36″. Read this to help you choose the right size for you. The mesh size determines how much ink will be deposited on your substrate and the level of detail that can be achieved in the print. What mesh do you need? See here.
Squeegees
Squeegees are used to push the ink through the screen and onto the substrate. They come in a variety of sizes and shapes, and the choice of squeegee will depend on the size of the design being printed. You can use wooden or aluminum squeegees. Squeegees can be soft, medium or hard. The hardness is determine by durometer. Most popular is medium which is 70 durometer.
Emulsion
Emulsion is a photosensitive liquid that is used to create the stencil on the screen. It is coated onto the screen and then dried, before being exposed to a light source. There are many different kinds of screen printing emulsion. How to choose right emulsion.
Ink
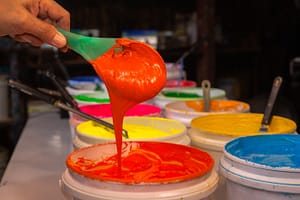
Ink is the material that is used to create the print. It comes in a variety of colors and consistencies, and the choice of ink will depend on the substrate being printed on and the desired effect. Most popular inks are water based and plastisol.
Exposure Unit
An exposure unit is used to expose the screen to a light source, which hardens the emulsion and creates the stencil. To expose a screen you can use a single light source, whole exposure unit or even sun. There are several types of light sources that can be used, including fluorescent lights, LED lights, and halogen bulbs.
Printing Press
A printing press is used to hold the screen in place and apply pressure to the squeegee, allowing the ink to be evenly distributed across the substrate. A press can hold one or multiple screens. With one screen you can print one color designs.
3. Preparing Your Artwork for Screen Printing
Vector vs. Raster Artwork
When creating artwork for screen printing, it is important to use the right file format. Vector artwork is preferred, as it can be scaled up or down without losing quality. Raster artwork, on the other hand, can become pixelated when scaled up.
Choosing the Right Colors
The colors used in the design will affect the final print. It is important to choose colors that will look good on the chosen substrate and that will complement each other well.
Preparing Artwork for Print
Once the artwork has been created, it will need to be prepared for print. This involves separating the design into individual colors and creating separate stencils for each color. To print your artwork you will need a transparent film. You can use inkjet printer with black ink. Make sure that color on the film doesn’t let light through.
4. Preparing Your Screen for Printing
Coating the Screen with Emulsion
To create the stencil, emulsion is applied to the screen and allowed to dry. This is done in a darkroom or other light-safe environment, because emulsion is light sensitive and will harden when exposed to light. To coat emulsion on the screen you can use a plastic applicator or a scoop coater. Scoop coaters come in many sizes and you will need to choose the one which fits inside your screen and covers area larger then your image size.
Drying and Exposing the Screen
Once the emulsion is dry, the screen is exposed to a light source. This hardens the emulsion and creates the stencil. The screen is then washed to remove any unexposed emulsion. It is important to expose the screen for the right time. If you expose it too long you might not be able to wash away the image area and if you expose it too short you could wash away more then you want, ruining the stencil.
5. Printing Your Design
Setting Up the Printing Press
The printing press is set up, and the screen is attached to the press. The substrate is placed on the press, and registration marks are used to ensure that the design is printed in the correct position. Registration marks will help you to print where you want. It will also help with multicolor prints.
Preparing the Ink
The ink is mixed to the desired consistency and color. The ink is then applied to the screen, and the squeegee is used to push the ink through the screen and onto the substrate.
Printing Your Design
Once the ink has been applied, the screen is lifted, and the substrate is removed from the press. The process is repeated for each color in the design.
6. Curing Your Printed Design
Curing the ink is important to make it permanent. This is done using a heat source, such as a heat gun, heat press or conveyor dryer. The ink is heated to a specific temperature for a specific amount of time to ensure that it is fully cured.
7. Troubleshooting Common Screen Printing Issues
Ink Bleeding
Ink bleeding can occur when the ink is applied too heavily or when the substrate is too absorbent. To prevent this, use a lighter hand when applying the ink and consider using a different substrate.
Screen Clogging
Screen clogging can occur when the mesh becomes blocked with ink or emulsion. To prevent this, clean the screen regularly and use a higher mesh count for more detailed designs.
Uneven Ink Distribution
Uneven ink distribution can occur when the squeegee is not applied evenly or when the substrate is not held securely in place. To prevent this, ensure that the squeegee is applied evenly and that the substrate is held securely in place.
8. Clean Your Screen
To clean your screen after you finish you will need some supplies. If you are using water based inks then water will be enough to remove leftover ink from the screen. For plastisol inks you will need ink cleaning liquid. To remove stencil from the screen you will need emulsion remover.
9. Conclusion
Screen printing can seem intimidating at first, but with the right equipment and a little practice, anyone can learn how to do it. By following the steps outlined in this article
By following the steps outlined in this article, you can start screen printing and create your own custom designs on a variety of substrates. Whether you are starting a business or just looking for a fun hobby, screen printing can be a rewarding and creative outlet.
If you are interested in screen printing, be sure to do your research and invest in quality equipment. It may take some time and practice to master the technique, but the results are well worth it.
There are many suppliers, art stores or even amazon where you can buy everything you need. You can get a screen printing kit like this one.
9. FAQs
- What kind of ink should I use for screen printing?
There are several types of ink that can be used for screen printing, including plastisol, water-based, and discharge inks. The type of ink you use will depend on the substrate you are printing on and the look you are trying to achieve.
- Can I screen print at home?
Yes, it is possible to screen print at home. However, you will need to invest in some equipment, including a light source for exposing the stencil. It is possible to start without a printing press, but your screen should be off contact. This means that you should not put the screen directly on top of the substrate.
- How long does it take to learn screen printing?
The time it takes to learn screen printing will vary depending on your skill level and the amount of time you dedicate to practicing. With regular practice, you can become proficient in screen printing within a few weeks or months.
- What substrates can I print on using screen printing?
Screen printing can be done on a wide variety of substrates, including t-shirts, posters, paper, vinyl, and more.
- How do I choose the right mesh count for my screen?
The mesh count of your screen will depend on the type of ink you are using and the level of detail in your design. A higher mesh count will provide finer detail, while a lower mesh count will allow for heavier ink coverage. Experiment with different mesh counts to find the one that works best for your specific design.
